In Into the Wild with AKS Automatic: A New Deployment Hope, we covered the prerequisites required to get started. In this post, we’ll move on to deploying a private AKS Automatic cluster within a customer-managed virtual network. Specificlly, we’ll cover the following topics:
- Navigational Data Points (Parameters)
- Engaging the Hyperdrive (Cluster Deployment)
- Entering the Navicomputer Data (Variables)
- Locating the API Server Coordinates (API Server subnet resource id)
- Locating the Cluster Node Coordinates (Cluster Node subnet resource id)
- Locating the Assigned Identity Coordinates (User Assigned Managed Identity resource id)
- Launching the AKS Automatic Cluster
- We’re Not Out of the Asteroid Field Yet
Throughout this post, I’ll use the Azure CLI (Bash), as it offers the clearest and most effective way to demonstrate and explain each step of the deployment process.
Navigational Data Points (Parameters)
To create the cluster using the Azure CLI, the az aks create command is used. Before proceeding with the deployment, there are several key parameters worth highlighting:
- sku: Specifies the type of managed cluster to deploy. To deploy an AKS Automatic cluster, this parameter must be set to automatic.
- apiserver-subnet-id: Defines the resource ID of the subnet to which the control plane API server pods will be assigned.
- vnet-subnet-id: Specifies the resource ID of the subnet into which the cluster nodes will be deployed.
- enable-private-cluster: Indicates that the cluster should be deployed as a private cluster. This parameter must be included to enable private cluster functionality.
- outbound-type: Determines how outbound traffic is handled for the cluster. Supported values include loadBalancer, userDefinedRouting, managedNATGateway, userAssignedNATGateway, none, and block. As discussed in Into the Wild with AKS Automatic: A New Deployment Hope, the target environment uses a NAT Gateway. Accordingly, this parameter must be set to userAssignedNATGateway.
Engaging the Hyperdrive (Cluster Deployment)
Entering the Navicomputer Data (Variables)
In the Into the Wild with AKS Automatic: A New Deployment Hope, several prerequisite resources were deployed for this deployment. Use the following commands to populate the variables for the resources that will be used when creating the cluster.
RG_NAME='rg-demo-01-aks'
RG_NETWORK_NAME='rg-demo-01-network'
LOCATION='Australia East'
IDENTITY_NAME='uami-demo-01-aks'
VNET_NAME='demo-01-vnet'
CLUSTER_NAME='aks-demo-01'
API_SERVER_SUBNET_NAME='APIServerSubnet'
CLUSTER_NODE_SUBNET_NAME='ClusterNodeSubnet'
Locating the API Server Coordinates (API Server subnet resource id)
The next step is to retrieve the API Server subnet resource ID and store it in a variable. This variable will be used later during the cluster deployment. Use the following command to obtain the value:
API_SERVER_SUBNET_ID=$(az network vnet subnet show \
  --resource-group $RG_NETWORK_NAME \
  --vnet-name $VNET_NAME \
  --name $API_SERVER_SUBNET_NAME \
  --query id \
  --output tsv)
Locating the Cluster Node Coordinates (Cluster Node subnet resource id)
The next step is to retrieve the Cluster Node subnet resource ID and store it in a variable. This variable will be used later during the cluster deployment. Use the following command to obtain the value:
CLUSTER_NODE_SUBNET_ID=$(az network vnet subnet show \
  --resource-group $RG_NETWORK_NAME \
  --vnet-name $VNET_NAME \
  --name $CLUSTER_NODE_SUBNET_NAME \
  --query id \
  --output tsv)
Locating the Assigned Identity Coordinates (User Assigned Managed Identity resource id)
The next step is to retrieve the User Assigned Managed Identity resource ID and store it in a variable. This variable will be used later during the cluster deployment. Use the following command to obtain the value:
IDENTITY_PRINCIPAL_ID=$(az identity show \
  --resource-group $RG_NAME \
  --name $IDENTITY_NAME \
  --query id \
  -o tsv)
Launching the AKS Automatic Cluster
To commence the clusters deployment use the following command.
az aks create \
--resource-group $RG_NAME \
--name $CLUSTER_NAME \
--location $LOCATION \
--apiserver-subnet-id $API_SERVER_SUBNET_ID \
--vnet-subnet-id $CLUSTER_NODE_SUBNET_ID \
--assign-identity $IDENTITY_PRINCIPAL_ID \
--sku automatic \
--enable-private-cluster \
--outbound-type userAssignedNATGateway \
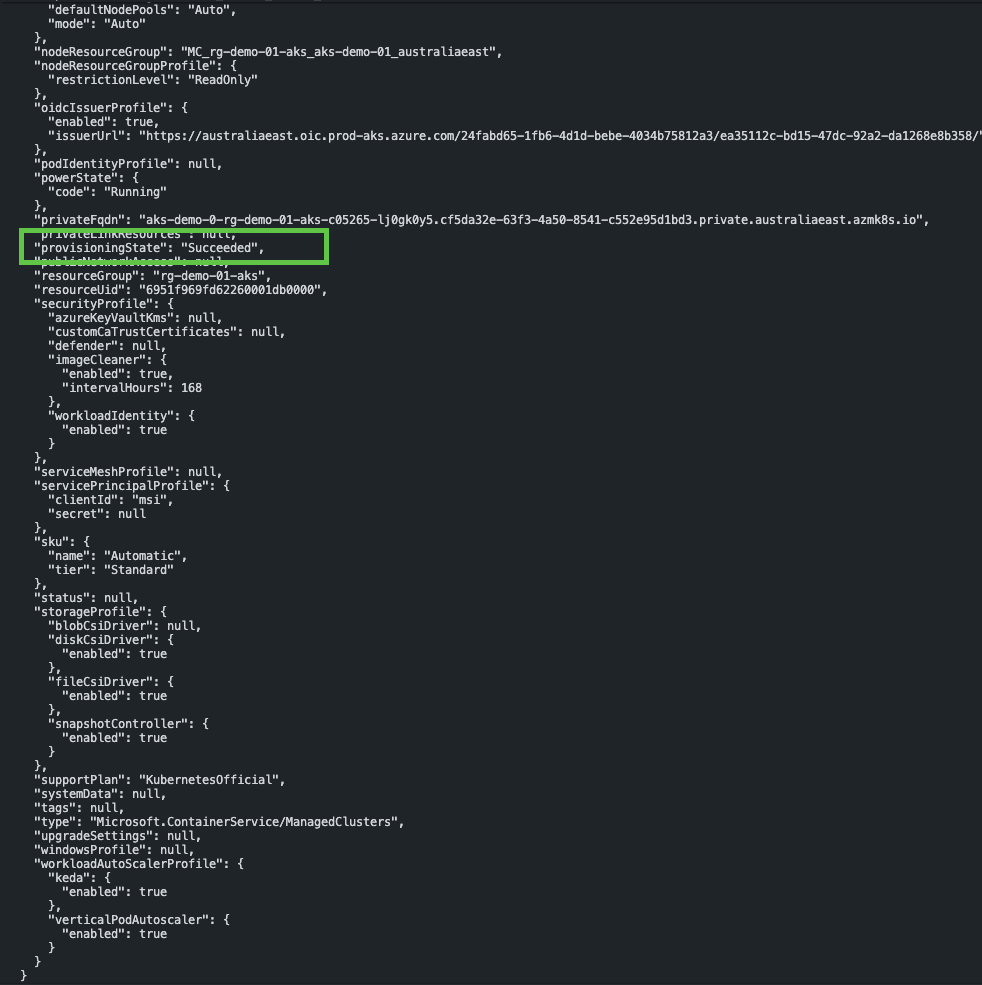
--no-ssh-keyIf the deployment completes successfully, you should see output similar to the following.
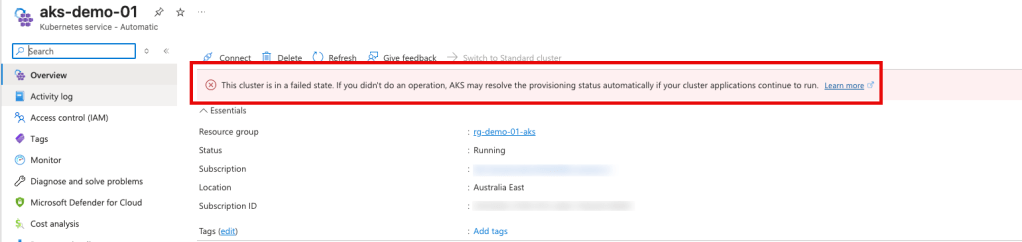
We’re Not Out of the Asteroid Field Yet
After the cluster has deployed, you may notice it tranisition to a failed state with the following error message “This cluster is in a failed state. If you didn’t do an operation, AKS may resolve the provisioning status automatically if your cluster applications continue to run.”
Two additional roles must be assigned to the User Assigned Managed Identity (UAMI) to complete the configuration. Use the following command to apply these role assignments:
IDENTITY_PRINCIPAL_ID=$(az identity show \
--resource-group $RG_NAME \
--name $IDENTITY_NAME \
--query principalId \
--output tsv)
CLUSTER_ID=$(az aks show \
--name $CLUSTER_NAME\
--resource-group $RG_NAME \
--query id \
--output tsv)
az role assignment create \
--scope $CLUSTER_ID \
--role "Azure Kubernetes Service Cluster User Role" \
--assignee $IDENTITY_PRINCIPAL_ID
az role assignment create \
--scope $CLUSTER_ID \
--role "Azure Kubernetes Service RBAC Writer" \
--assignee $IDENTITY_PRINCIPAL_ID
az aks update \
--resource-group $RG_NAME \
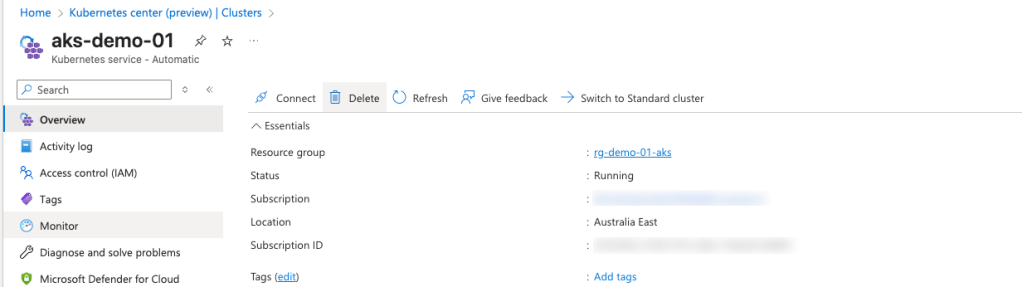
--name $CLUSTER_NAMEBalance has been restored, and the cluster should now return to a healthy state.

Leave a comment